 /
/ 
How to Create a Top-Down Video Game Style Home for your Website
Part 2: Making a Controllable Character
Originally posted on 4 March 2026.
If you made it through Part 1 of this tutorial, you should now have an empty room: a repeating floor pattern, wall pattern and a divider between the two. Now, we need to put someone inside the room.
1. Draw the sprite
Let’s add our character sprite to our list of variables:
const sprite = document.getElementById("sprite");
And let’s draw it in our draw() function:
if (sprite.complete) {
    ctx.drawImage(sprite, 0, 0);
}
There he is! We’re going to move him down to the bottom-middle of our canvas, but first, we need to add its height and width as constants. You can set these as the height and width of the actual image you have saved, or change it if you want to scale your sprite bigger or smaller. I’m going to make mine double the size.
Add this to the constants section of your file:
const spriteHeight = 56;
const spriteWidth = 32;
And now, let’s change the statement we wrote inside the draw() function to set its position on the bottom-middle and scale it to the height and width I’ve defined:
if (sprite.complete) {
   ctx.drawImage(sprite, (canvas.width - spriteWidth) / 2, canvas.height - spriteHeight, spriteWidth, spriteHeight);
}
That made my sprite really blurry, so I’m also going to add this to the top of my draw() function to stop my scaled up images from smoothing:
ctx.imageSmoothingEnabled = false;
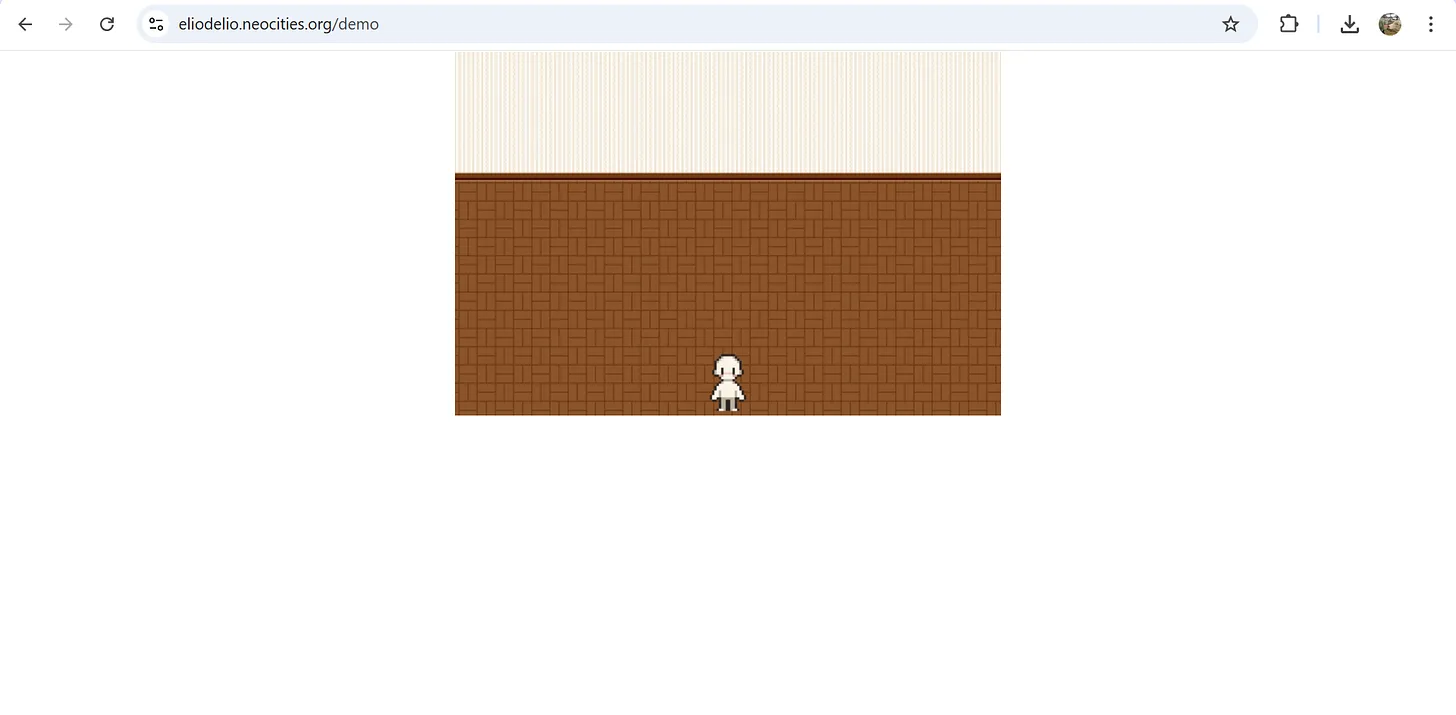
Now, you should be looking at something like this:
Time to…
2. Make it move
In order for our sprite to move, its position coordinates need to be variables that can change. Let’s go back up to where we keep our variables, and add this:
let spriteX = (canvas.width - spriteWidth) / 2;
let spriteY = canvas.height - spriteHeight;
And now, inside our draw() function, we can change our sprite’s position to follow these variables:
if (sprite.complete) {
   ctx.drawImage(sprite, spriteX, spriteY, spriteWidth, spriteHeight);
}
I’m going to make my sprite move according to the arrow keys. We are going to start by going back up to our variables. We will be using these to track keypress events:
let rightPressed = false;
let leftPressed = false;
let upPressed = false;
let downPressed = false;
Their default value is false, and when a key is pressed, we want it to become true and trigger a function. Let’s add the following event listener functions into our startGame() function, above where we’ve called draw():
document.addEventListener("keydown", keyDownHandler);
document.addEventListener("keyup", keyUpHandler);
function keyDownHandler(e) {
    if (e.key === "Right" || e.key === "ArrowRight") {
        rightPressed = true;
    } else if (e.key === "Left" || e.key === "ArrowLeft") {
        leftPressed = true;
    } else if (e.key === "Up" || e.key === "ArrowUp") {
        upPressed = true;
    } else if (e.key === "Down" || e.key === "ArrowDown") {
        downPressed = true;
    }
function keyUpHandler(e) {
    if (e.key === "Right" || e.key === "ArrowRight") {
        rightPressed = false;
    } else if (e.key === "Left" || e.key === "ArrowLeft") {
        leftPressed = false;
    }  else if (e.key === "Up" || e.key === "ArrowUp") {
        upPressed = false;
    } else if (e.key === "Down" || e.key === "ArrowDown") {
        downPressed = false;
    }
}
};
Now, when a key is pressed, it triggers the keyDownHandler and the variable becomes true, and when the key stops being pressed, it triggers the keyUpHandler and the variable becomes false again. All that’s left is to use this variable in our actual draw() function so that it changes the x and y coordinates of our sprite’s position.
Go back up, to our draw() function, and add this above where you’ve drawn your sprite (the block of code that begins “if (sprite.complete) {…”):
if (rightPressed) {
   spriteX = Math.min(spriteX + 5, canvas.width - spriteWidth);
}
if (leftPressed) {
   spriteX = Math.max(spriteX - 5, 0);
}
if (upPressed) {
   spriteY = Math.max(spriteY - 5, 0);
}
if (downPressed) {
   spriteY = Math.min(spriteY + 5, canvas.height - spriteHeight);
}
There’s just one thing left to do. Currently, our draw() function is only called once, meaning everything inside it stays static. At the end of the draw() function, add this line to add a framerate to our animation:
requestAnimationFrame(draw);
And, at the top of the draw() function, add this line to clear the canvas and re-draw it for each frame (otherwise, you would end up with a trail of every frame of your moving sprite):
ctx.clearRect(0, 0, canvas.width, canvas.height);
That was a lot of code. If your sprite still isn’t moving and you’re not sure where you went wrong, you can check your JS code against mine here.
If it is moving, you’ll notice that it’s also walking up the walls. We don’t want that.
3. Stop the sprite from walking into things
So, how are we going to make our character know when it’s walking into a wall and then stop walking in that direction? Instead of calculating the next position coordinates according to each keystroke and then immediately moving to it, we want a function that will first check if the new position it would move to is part of the area we don’t want it to access.
We’re going to start by writing a function outside of our other functions (I’m putting mine right after my list of variables) that will check if the new position is inside the area of the wall.
function willCollide(newX, newY) {
    return(
        newY + spriteHeight < wallHeight + dividerHeight
    )
}
Now we have a function that will tell us if the new Y coordinate would be out of bounds.
Next, we need to go back into our draw() function and edit the if statements that tell our sprite where to move and add an additional condition to them. Instead of:
if (rightPressed) {
    spriteX = Math.min(spriteX + 5, canvas.width - spriteWidth);
}
we are now going to write:
if (rightPressed) {
    let newX = Math.min(spriteX + 5, canvas.width - spriteWidth);
    if (!willCollide(newX, spriteY)) {
        spriteX = newX;
    }
}
Do the same thing for the next three statements, as well. Go on. You can do it.
If everything went well, your sprite should now obey the laws of nature and stop at the wall. I’m going to go ahead and add a tiny buffer zone, because I don’t like that it reaches the very edge of the floor.
function willCollide(newX, newY) {
    return(
        newY + spriteHeight < wallHeight + dividerHeight + 5
    )
}
And now, we’re done! You can check my full JS code here. We haven’t changed anything in the CSS and HTML since Part 1.
If you’re ready to learn how to make furniture that your character sprite can interact with, go ahead to Part 3!